
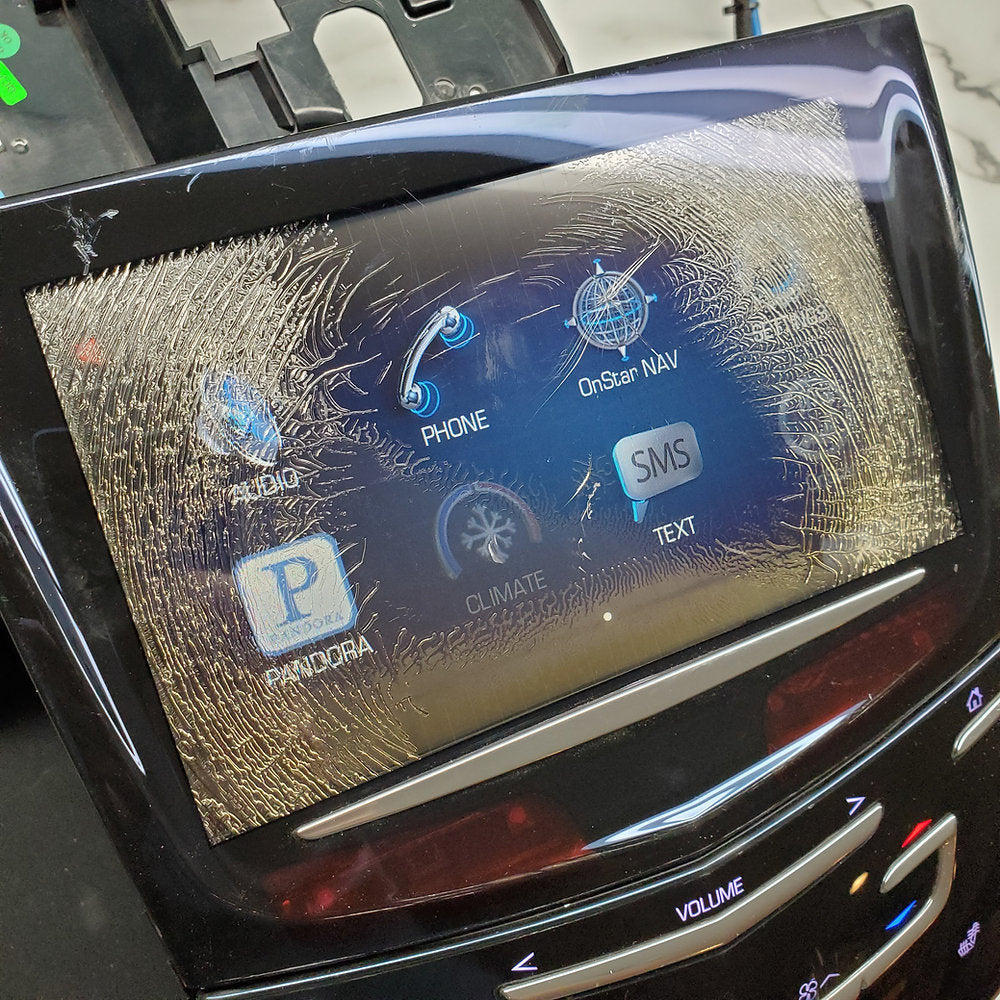
Uconnect screen delamination occurs when the touchscreen’s outer digitizer layer separates from the LCD display, causing bubbling, ghost touches, or unresponsive spots. The fix ranges from a full digitizer glass replacement (DIY cost: $30–$80) to replacing the entire radio head unit ($400–$1,200+). Mopar issued extended warranty coverage on certain 2017–2021 models for this defect, so always check your VIN with a dealer before paying out of pocket.
What causes Uconnect screen delamination?
Delamination happens when the adhesive bond between the digitizer glass and the LCD panel breaks down, typically due to heat cycling, UV exposure, and poor factory adhesive quality. This is a manufacturing defect, not user error, and it affects thousands of owners across multiple Stellantis platforms.
The Uconnect systems—particularly the 8.4-inch touchscreen (Uconnect 4 and 4C variants)—use a layered construction. The outermost touch-sensitive digitizer is bonded to the LCD using optically clear adhesive (OCA). Over time, repeated expansion and contraction from temperature swings causes the adhesive to weaken and separate.
Why certain climates make it worse
- Extreme heat: Vehicles parked in direct sunlight in states like Arizona, Texas, and Florida see delamination much sooner—sometimes within 2–3 years.
- Cold-to-hot transitions: Moving from a heated garage to freezing outdoor temperatures accelerates adhesive failure.
- Humidity: Moisture can seep into micro-gaps in the adhesive layer, worsening the separation.
Factory adhesive quality issues
Multiple teardown analyses and forum reports confirm that Stellantis used lower-grade OCA in production runs from roughly 2017 to 2020. This adhesive has a lower thermal resistance threshold than what aftermarket digitizer suppliers offer. The result is predictable: the bond fails under conditions the vehicle was supposedly designed to handle.
Pro tip: If your screen is just starting to show small bubbles near the edges, act now. Delamination spreads inward over time, and catching it early means a cheaper and easier repair.
How to tell if your Uconnect screen is delaminating
Look for air bubbles under the glass, sections of the screen that don’t respond to touch, or ghost inputs where the screen registers touches you didn’t make. These are the hallmark symptoms of digitizer-to-LCD separation.
Common symptoms checklist
- Bubbling or rippling: Visible air pockets, usually starting at the screen edges or corners.
- Ghost touches: The radio changes stations, the navigation zooms randomly, or settings menus open on their own.
- Dead zones: Specific areas of the screen stop responding to finger input entirely.
- Distorted display: Colors appear uneven or there are visible rainbow patterns where the adhesive has separated.
- Worsening in heat: Symptoms are noticeably worse on hot days or after the vehicle has been parked in the sun.
Ruling out other problems
Before assuming delamination, perform a hard reset by holding the volume and tuner knobs simultaneously for 10–15 seconds. If the problem persists after reboot, and you can see physical distortion in the screen layers, it is delamination. A software glitch will resolve with the reset; delamination will not.
Which Uconnect systems and vehicle models are affected?
The delamination issue primarily affects the 8.4-inch touchscreen across Uconnect 4 and 4C platforms used in 2015–2022 model year vehicles. This includes the Dodge Durango, Chrysler Pacifica, Jeep Grand Cherokee (WK2), Ram 1500/2500/3500, and Dodge Charger/Challenger.
Model-by-model breakdown
| Vehicle | Model Years | Uconnect Version | Prevalence |
|---|---|---|---|
| Jeep Grand Cherokee (WK2) | 2014–2021 | Uconnect 4/4C | Very High |
| Chrysler Pacifica | 2017–2022 | Uconnect 4/4C | High |
| Dodge Durango | 2014–2021 | Uconnect 4/4C | Very High |
| Ram 1500 (DT) | 2019–2022 | Uconnect 4C | High |
| Ram 1500/2500/3500 (DS) | 2013–2018 | Uconnect 4 | Moderate |
| Dodge Charger/Challenger | 2015–2021 | Uconnect 4/4C | Moderate |
| Jeep Wrangler (JL) | 2018–2022 | Uconnect 4 | Moderate |
Does Mopar cover Uconnect delamination under warranty or recall?
Mopar issued a Technical Service Bulletin (TSB) and, in some cases, an extended warranty coverage letter for Uconnect screen delamination on select models. Coverage is VIN-specific, so contact your dealer with your VIN to check eligibility before paying for repairs.
Known TSB and coverage details
- TSB 08-088-21: Addresses touchscreen delamination on 2018–2021 vehicles with the 8.4-inch display. Covers replacement under the basic warranty or extended coverage if applicable.
- Extended warranty letters: Some owners of 2017–2020 Grand Cherokees and Pacificas received letters extending coverage to 5 years/60,000 miles for this specific defect.
- Customer Satisfaction Notification (CSN): Certain VIN ranges were flagged for proactive dealer replacement. Ask specifically about any open CSN campaigns on your vehicle.
How to check your eligibility
- Call your local Stellantis dealership’s service department.
- Provide your full 17-digit VIN.
- Ask them to check for any open recalls, TSBs, CSN campaigns, or extended warranty coverages related to the radio or touchscreen.
- If they say nothing is available, ask them to run a “VIP” or “Star” case search—sometimes coverage exists under customer goodwill programs that the advisor doesn’t check automatically.
DIY Uconnect screen delamination fix: Step-by-step digitizer replacement
You can replace just the digitizer glass on your Uconnect 8.4 screen without replacing the entire head unit. The repair takes 1–2 hours and costs $30–$80 for the replacement digitizer. You will need basic tools, a heat gun, and patience with adhesive removal.
Tools and parts you need
- Replacement digitizer glass (search “Uconnect 8.4 digitizer” for your specific year)
- Plastic trim removal tools (pry tools)
- Heat gun or hair dryer
- Isopropyl alcohol (90% or higher)
- Microfiber cloth
- New adhesive strips or OCA tape
- T8 or T10 Torx screwdriver (depending on model)
- Suction cup (optional, for glass removal)
Removal process
- Disconnect the battery: Remove the negative terminal and wait 10 minutes. This prevents electrical shorts and airbag-related issues during trim removal.
- Remove surrounding trim: Use plastic pry tools to carefully pop off the bezel surrounding the Uconnect screen. On most models, it’s held by clips only—no screws.
- Remove the radio head unit: Typically secured by 4 Torx screws. Slide the unit forward and disconnect the wiring harnesses on the back.
- Heat the digitizer edges: Use a heat gun on low-medium setting to soften the adhesive holding the glass digitizer to the LCD frame. Work slowly around the perimeter.
- Separate the digitizer from the LCD: Use a thin plastic spudger to carefully pry the digitizer away from the LCD. Work from the edges inward. Do not use metal tools—you will damage the LCD panel.
- Clean the LCD surface: Remove all old adhesive residue with isopropyl alcohol and a microfiber cloth. The surface must be spotless for the new digitizer to bond properly.
- Install the new digitizer: Apply new OCA tape or adhesive strips to the frame, align the replacement digitizer, and press firmly into place. Reconnect the digitizer ribbon cable.
- Reassemble: Reinstall the head unit, reconnect all harnesses, replace trim, reconnect the battery, and test the screen.
Common DIY mistakes to avoid
- Using too much heat: High heat will damage the LCD panel itself. Keep the heat gun moving and on low-medium settings.
- Skipping the battery disconnect: The Uconnect system remains live even with the ignition off. Disconnecting the battery prevents shorting the unit.
- Touching the LCD surface with bare fingers: Oils from your skin can create spots visible through the screen after reassembly. Wear clean gloves.
- Rushing the adhesive removal: Old adhesive left on the LCD will create uneven bonding and new bubbles. Take your time.
Professional repair and full head unit replacement costs
If you’re not comfortable with DIY, a dealership or independent shop can handle the repair. Expect $300–$600 for digitizer-only replacement at a shop, or $800–$1,500 for a full Mopar remanufactured head unit swap.
Repair option comparison
| Repair Option | Cost Range | Time | Warranty |
|---|---|---|---|
| DIY digitizer replacement | $30–$80 | 1–2 hours | None (part warranty only) |
| Independent shop digitizer repair | $300–$600 | 2–4 hours | 30–90 days labor |
| Dealership digitizer replacement | $400–$700 | 1–2 days | 12 months/12,000 miles |
| Dealership full head unit replacement (new) | $1,200–$1,800 | Same day | 12 months/12,000 miles |
| Remanufactured head unit (online) | $400–$800 | Shipping + install | Varies by seller |
When to choose full replacement over repair
- The LCD panel itself is damaged (not just the digitizer).
- The internal circuit board shows corrosion or burn marks.
- Multiple digitizer replacements have failed, suggesting an underlying hardware fault.
- You want the latest software and navigation maps (new units come preloaded).
Preventing Uconnect delamination from coming back
After fixing delamination, use a quality UV-reducing windshield sunshade and consider ceramic window tint to reduce interior heat buildup. These measures significantly extend the life of the new digitizer adhesive.
- Use a sunshade religiously: Even on cloudy days, UV and infrared radiation reach the dash.
- Park in shade when possible: Reduces peak dashboard temperatures by 20–30°F.
- Consider a screen protector: Some aftermarket screen protectors add an extra layer that can absorb minor thermal stress.
- Avoid aftermarket adhesive shortcuts: If you’re replacing the digitizer, use proper OCA tape—not super glue, not double-sided tape, and not silicone adhesive.
Frequently Asked Questions
Will Uconnect screen delamination get worse if I ignore it?
Yes. Delamination is progressive.
Small edge bubbles will grow into large separated areas, eventually causing ghost touches that make the screen unusable for safe vehicle operation. The earlier you address it, the easier and cheaper the fix.
Can a software update fix screen delamination?
No. Delamination is a physical hardware failure between the digitizer and LCD layers.
No software or firmware update can re-bond separated adhesive. If a dealer suggests a software update as the fix, they are misdiagnosing the problem.
Is there a class action lawsuit for Uconnect delamination?
As of the latest information available, there have been consumer complaints filed with the NHTSA and legal discussions around this defect, but no widely publicized class action settlement specifically for Uconnect delamination. Check your state’s lemon law statutes and consult with a consumer protection attorney if your vehicle qualifies.
Can I use an aftermarket Android screen to replace the delaminated Uconnect?
Aftermarket Android-based replacement head units exist for many Stellantis vehicles. However, they often lose integration with factory features like backup cameras, steering wheel controls, heated seat settings, and vehicle diagnostics unless you purchase a model-specific unit with proper CAN-bus adapters. Research compatibility carefully before buying.
Does the Uconnect 5 (10.1-inch or 12-inch) screen have the same delamination problem?
The newer Uconnect 5 platform uses a different screen construction and, so far, shows significantly fewer reports of delamination. However, these systems are newer, and long-term heat exposure data is still developing. If you’re purchasing a used vehicle, the Uconnect 5 system is generally a safer bet for screen longevity.
Take action before the ghost touches take over your radio
Uconnect screen delamination is a well-documented manufacturing defect that Stellantis has partially acknowledged through TSBs and selective extended coverage. Whether you go the DIY digitizer route for under $80 or push your dealer to cover it under warranty, do not wait until ghost touches make your infotainment system a distraction hazard. Check your VIN for coverage today, gather your repair options, and fix it before the summer heat makes it twice as bad.
Leave a Reply