The Ford F150 blend door actuator location depends on your truck’s model year and climate control system. On most F150s (2009–2020), the primary (passenger-side/upper) blend door actuator is located directly behind the glove box or center radio stack, while the secondary (driver-side/lower) actuator is located under the driver’s side dash, near the floor console next to the gas pedal.
Where is the Ford F150 Blend Door Actuator Located?
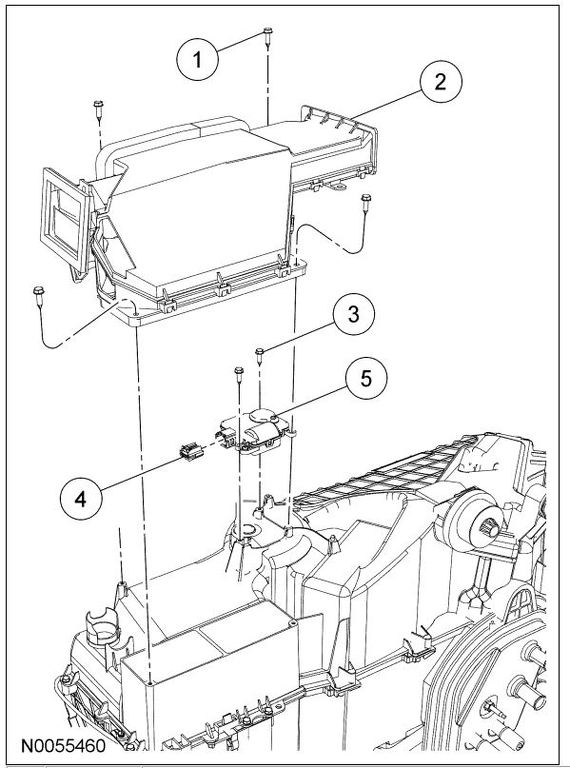
The blend door actuators on a Ford F150 are positioned on the main HVAC plenum box behind the dashboard, with their exact locations determined by whether your truck has single or dual-zone climate control.
If your F150 is equipped with single-zone climate control, you only have one blend door actuator, which is typically the upper actuator located behind the radio bezel and glove box assembly. This single motor controls the temperature sweep for the entire cabin by mixing hot air from the heater core with cold air from the A/C evaporator.
For F150s equipped with dual-zone climate control, there are two separate blend door actuators. The upper actuator (passenger side) sits behind the center radio stack and controls the passenger’s air temperature, while the lower actuator (driver side) is tucked deep under the driver’s side dash near the accelerator pedal, controlling the driver’s temperature.
| F150 Generation | Actuator Function | Physical Location | Ease of Access |
|---|---|---|---|
| 2009 – 2014 | Upper (Passenger/Single Zone) | Behind the radio/center dash stack | Moderate (Requires radio bezel removal) |
| 2009 – 2014 | Lower (Driver Side Dual Zone) | Under dash, above gas pedal assembly | Difficult (Tight space, blind fasteners) |
| 2015 – 2020 | Upper (Passenger/Single Zone) | Behind the glove box, right of center console | Easy (Drop glove box down) |
| 2015 – 2020 | Lower (Driver Side Dual Zone) | Under driver’s side footwell, near console wall | Hard (Requires console trim removal) |
Why Do Ford F150 Blend Door Actuators Fail?
Ford F150 blend door actuators fail primarily due to stripped internal plastic gears, electric motor burnout, or physical binding of the HVAC blend doors themselves.
1. Stripped Internal Plastic Gears (The OEM Weakness)
Inside the OEM Motorcraft blend door actuator is a series of tiny, thin plastic gears driven by a small 12-volt DC motor. Over time, the constant torque applied when the system calibrates or changes temperature sweeps causes these plastic teeth to fatigue, crack, and eventually shear off.
When the teeth shear, the motor spins freely, causing the infamous clicking or popping sound behind your dashboard.
2. Electric Motor Burnout and Circuit Board Failure
The actuator contains a small feedback potentiometer that tells the HVAC module (EATC or EMTC) the exact position of the blend door. If this internal circuit board develops a cold solder joint or the potentiometer wears out, the module loses track of the door’s position.
This causes the motor to run continuously against its physical stops, burning out the motor windings and rendering the unit completely dead.
3. Binding Blend Doors (The Overlooked Trap)
Sometimes, the actuator is not the root cause of the failure, but rather the victim of a warped or binding HVAC blend door. The plastic doors inside the heater core housing can warp from extreme heat cycles or collect foam insulation debris that peels off the ductwork.
If the door cannot swing freely, it places immense resistance on the actuator, stripping the gears of any new replacement unit you install within days.
How to Diagnose Which F150 Actuator is Broken
You can accurately diagnose which Ford F150 blend door actuator is broken by performing a manual temperature sweep test, listening for specific clicking locations, or pulling body control codes with an advanced OBD-II scanner.
Step 1: The Temperature Sweep and Zone Isolation Test
Turn on your truck and set the blower motor speed to medium. If you have dual-zone climate control, set both sides to “LO” and verify cold air is blowing.
Slowly turn the driver’s side temperature to “HI” while keeping the passenger side at “LO”. If the driver’s side air remains ice cold while the passenger side functions normally, your lower (driver-side) actuator has failed.
Step 2: The Physical Sound and Location Test
Turn the ignition key to the “ON” position without starting the engine to eliminate engine noise. Change your temperature settings from hot to cold and listen closely to the dashboard.
A rapid, rhythmic clicking or tapping sound coming from directly behind the radio indicates a stripped upper actuator, while a clicking sound coming from near your right knee in the footwell points to the lower actuator.
Step 3: Reading HVAC Diagnostic Trouble Codes (DTCs)
Generic OBD-II code readers cannot access the HVAC module, but advanced scanners running software like FORScan can pull body control module (BCM) codes. Look for specific HVAC codes such as B1081 (Left Blend Door Actuator Circuit Failure) or B1082 (Right Blend Door Actuator Circuit Failure).
These codes pinpoint the exact electrical or mechanical failure without requiring any dashboard disassembly.
Step-by-Step Guide: Replacing the Upper (Passenger Side) Actuator
Replacing the upper blend door actuator on a Ford F150 involves removing the radio bezel or dropping the glove box to gain access to the HVAC plenum casing.
Tools and Materials Needed:
- 7mm and 8mm sockets with a 1/4-inch drive ratchet
- 5.5mm socket or nut driver (crucial for actuator mounting screws)
- Plastic trim panel removal tools
- Replacement OEM Motorcraft Blend Door Actuator
Step 1: Disconnect the Battery and Prep the Vehicle
Before beginning, disconnect the negative battery cable under the hood to prevent shorting out the HVAC module. Pop open the passenger-side glove box, squeeze the outer tabs inward to release the stops, and let the glove box swing all the way down toward the floorboard.
This provides a clear line of sight to the side of the HVAC housing.
Step 2: Remove the Center Radio Bezel (For 2009–2014 Models)
Use a plastic trim tool to pry off the decorative trim panels on either side of the radio stack. Remove the 7mm screws securing the main center radio bezel to the dash.
Carefully pull the bezel forward, disconnect the wiring harnesses for the climate controls and hazard switch, and set the bezel aside to expose the upper actuator mounted on top of the ductwork.
Step 3: Extract the Failed Actuator
Locate the upper actuator, which is held in place by two 5.5mm hex-head screws. Using a small 1/4-inch ratchet or a flexible nut driver, carefully back out both screws.
Be extremely cautious not to drop these screws into the dark recesses of the dashboard. Gently pull the actuator straight up and off the keyed D-shaft of the blend door, then squeeze the electrical connector tab to release the wiring harness.
Pro Tip: Before installing the new actuator, manually turn the plastic D-shaft of the blend door with your fingers or a flathead screwdriver. It should swing smoothly from stop to stop without any binding or tight spots. If it feels stuck, your blend door is warped, and installing a new actuator will not fix the issue.
Step 4: Install the New Actuator
Plug the electrical connector into the new actuator first. Align the splined female gear of the new actuator with the male D-shaft of the blend door.
If they do not align perfectly, do not force them; instead, gently rotate the blend door shaft manually until the actuator slips flush onto the mounting bracket.
Reinstall the two 5.5mm screws and hand-tighten them to avoid cracking the plastic housing.
Step-by-Step Guide: Replacing the Lower (Driver Side) Actuator
Replacing the lower driver-side actuator does not require pulling the entire dashboard if you use a specialized 1/4-inch drive ratchet extension setup through the driver’s footwell.
Tools and Materials Needed:
- 1/4-inch drive mini ratchet or thumbwheel ratchet
- 5.5mm stubby socket
- T20 Torx bit (depending on exact model year)
- Flashlight or headlamp
Step 1: Access the Driver’s Footwell
Move the driver’s seat all the way back to maximize your workspace. Lie on your back on the driver’s side floorboard looking up past the accelerator pedal toward the center console stack.
Remove the plastic trim panel on the right side of the footwell by pulling the push-pins straight out.
Step 2: Locate and Unbolt the Lower Actuator
You will see the lower actuator mounted vertically on the bottom of the HVAC casing. The rear mounting screw is highly visible, but the front mounting screw is hidden behind a plastic HVAC duct bracket.
Use a mini thumbwheel ratchet with a 5.5mm socket to slowly back out both screws. You will have very limited swing room, so patience is key during this step.
Step 3: Swap and Reinstall
Disconnect the electrical connector and slide the old actuator down off the blend door shaft. Slide the new actuator onto the shaft, ensuring the alignment pins seat perfectly into the HVAC housing.
Thread the 5.5mm screws back in by hand first to ensure they are not cross-threaded, then snug them down with your mini ratchet.
How to Calibrate the New Ford F150 Blend Door Actuator
You must calibrate your new Ford F150 blend door actuator after installation to prevent the HVAC module from stripping the new plastic gears during its first power cycle.
Method 1: The Fuse Pull Calibration Process
- Ensure the ignition key is completely in the “OFF” position.
- Locate the passenger-side kick panel fuse box and remove the cover.
- Pull the dedicated HVAC module fuse (typically Fuse #15 on 2009-2014 models, or Fuse #46 on 2015-2020 models; consult your owner’s manual).
- Wait at least 60 seconds to allow the internal capacitors in the climate control module to fully discharge.
- Reinsert the fuse and reinstall the fuse cover.
- Turn the ignition key to the “ON” position (do not start the engine).
- Do not touch any climate controls for at least 90 seconds. You will hear the new actuator slowly sweep from one end stop to the other, recording its voltage limits.
- Turn the ignition off, then start the truck and test the temperature controls.
Method 2: The Battery Disconnect Calibration Process
If you cannot locate the correct fuse, disconnect the negative battery cable for 5 minutes. Reconnect the cable, turn the ignition key to the “ON” position, and let the truck sit untouched for 2 minutes.
The HVAC module will automatically initiate a self-test and calibrate the travel limits of all connected blend and mode door actuators.
Frequently Asked Questions (FAQs)
Can I drive my F150 with a broken blend door actuator?
Yes, you can safely drive your truck with a broken actuator. The only consequence is the loss of temperature control, meaning your cabin vents will be stuck blowing either full hot or full cold air depending on where the door was positioned when the actuator failed.
How long does it take to replace an F150 blend door actuator?
Replacing the upper passenger-side actuator takes approximately 30 to 45 minutes for a DIYer. Replacing the lower driver-side actuator is much tighter and typically takes 1 to 2 hours due to the limited tool clearance and blind bolt locations.
Should I buy an aftermarket actuator or stick with OEM Motorcraft?
It is highly recommended to buy original OEM Motorcraft actuators. Many cheap aftermarket options do not have the correct internal potentiometer resistance values, which can cause calibration failures or premature gear stripping within just a few weeks of installation.
Why is my heater still blowing cold after replacing the blend door actuator?
If you replaced the actuator and still have no heat, you likely have a clogged heater core, a failing thermostat, or you skipped the crucial calibration step. Try running the fuse-pull calibration process again to ensure the HVAC module recognizes the new part’s sweep limits.
Conclusion
Diagnosing and replacing a Ford F150 blend door actuator is a highly manageable DIY project that can save you between $800 and $1,500 in dealership labor costs.
By identifying whether your issue lies with the upper passenger-side or lower driver-side unit, using the correct 5.5mm tools, and executing the critical post-installation calibration sequence, you can restore perfect climate control to your truck’s cabin.
Always opt for OEM Motorcraft replacement components to ensure long-term durability and trouble-free operation.
Leave a Reply