To hook up trailer lights, identify your vehicle’s wiring harness connector (usually a 4-pin or 7-pin plug under the rear bumper), match it to your trailer’s plug, plug them together, and test all functions: brake lights, turn signals, and running lights.
If no connector exists, install a trailer wiring harness kit following the vehicle’s specific instructions, typically involving splicing into the tail light wires behind the rear lamps.
How to Test Trailer Lights Before Hooking Up
Always test your trailer’s lights independently before connecting to your vehicle to avoid blaming the truck for trailer issues.
Grab a 12V test light or multimeter, a car battery, and jumper wires—I’ve wasted hours diagnosing “vehicle problems” that were just bad trailer grounds.
Connect the trailer’s white ground wire directly to the battery negative terminal.
Then, probe the other wires (brown for tail/running lights, yellow/green for left/right turn/brake, blue for electric brakes if equipped) to the battery positive—this lights them up one by one.
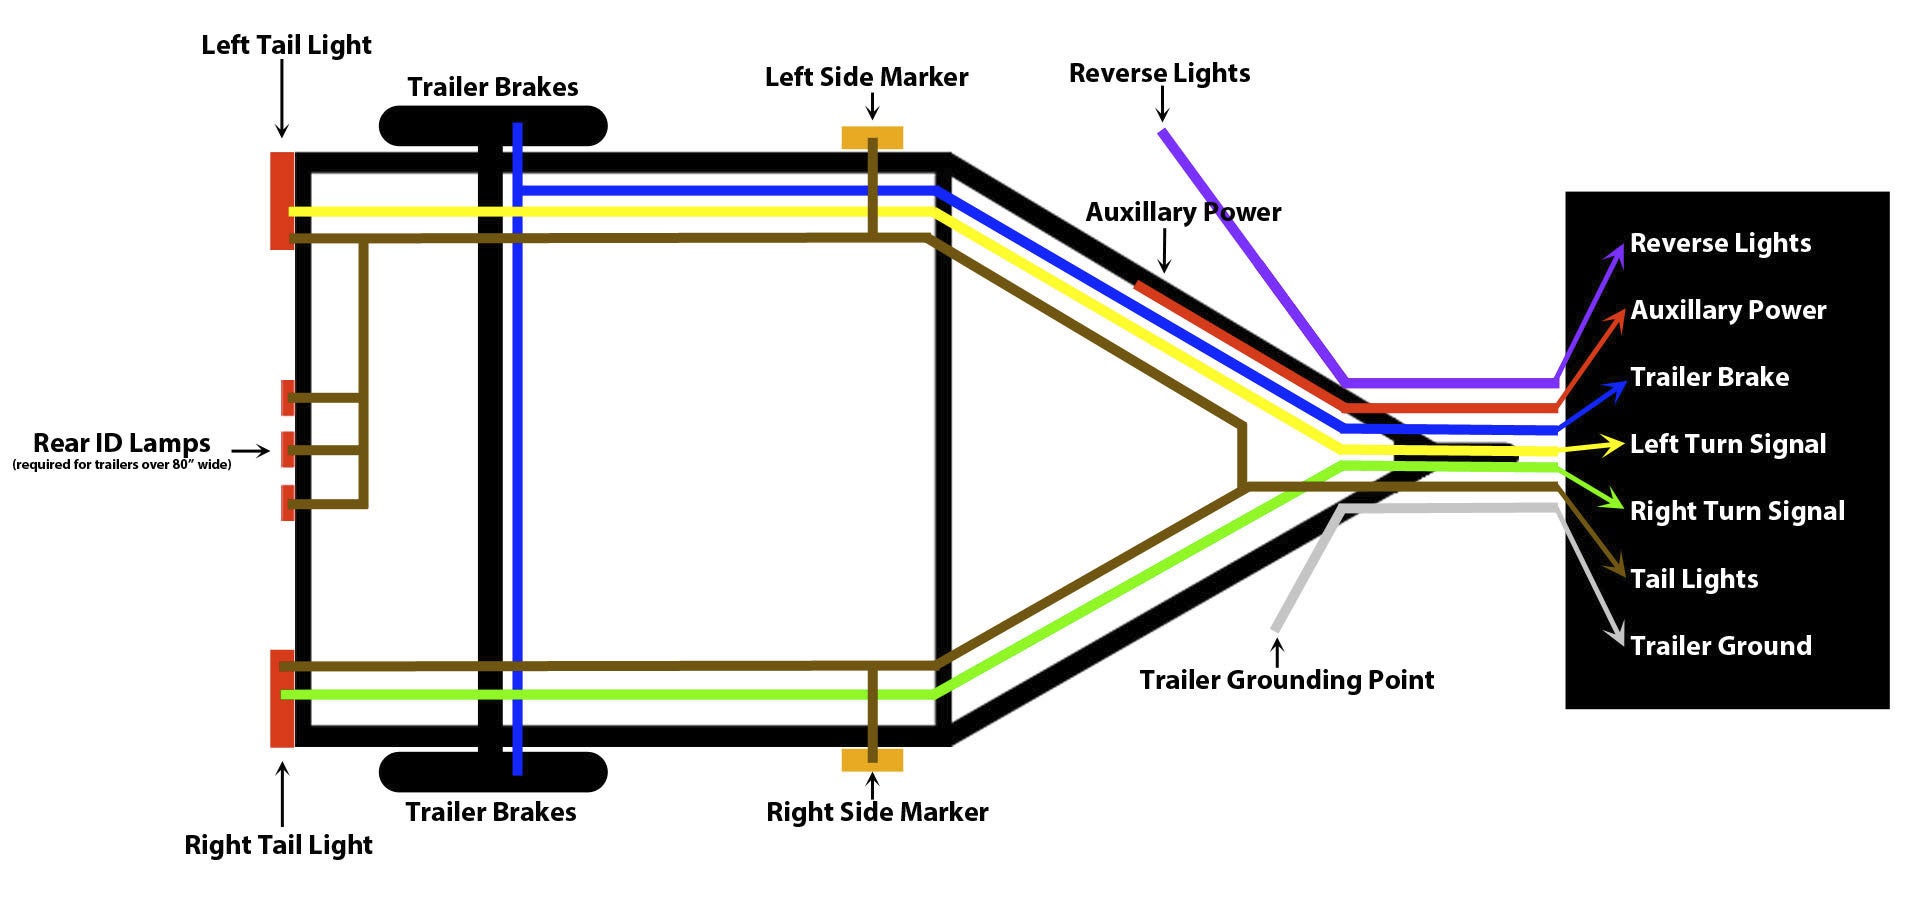
Common Trailer Light Wire Colors and Functions
- White: Ground—most failures here from corrosion.
- Brown: Tail, marker, and running lights.
- Yellow: Left turn signal and brake light.
- Green: Right turn signal and brake light.
- Blue: Electric brake controller output (7-pin only).
- Black: 12V battery charge/hot lead (7-pin).
If lights flicker or don’t work, check bulbs, sockets for water intrusion, and grounds.
Replace cheap LED conversions with sealed marine-grade bulbs—they last seasons longer in real-world mud and rain.
4-Pin vs 7-Way Trailer Wiring: Which Connector Do You Need?
Use a 4-pin flat connector for basic boat/utility trailers needing only tail, brake, and turn signals; upgrade to 7-way RV blade for full-featured trailers with brakes, battery charge, and reverse lights.
Mismatching causes half the “my trailer lights don’t work” calls I get at the shop.
Inspect your hitch area: most trucks post-2000 have a factory 4-pin or 7-pin under the bumper.
Cars and SUVs often need aftermarket kits—Tekonsha or Curt are reliable, avoid $10 no-name eBay junk that melts wiring.
Key Differences in a Quick Comparison Table
| Feature | 4-Pin Flat | 7-Way Blade |
|---|---|---|
| Pins | 4 | 7 |
| Functions | Tail, Brake, Left/Right Turn | + Brakes, Backup, 12V Aux, Ground |
| Best For | Light trailers <3,000 lbs | Heavy/RV trailers |
| Cost to Install | $20-50 DIY | $50-150 DIY |
Pro tip: 4-pin adapters to 7-way exist but suck for power—get a full converter module if upgrading.
Tools and Materials Needed to Hook Up Trailer Lights
You’ll need a vehicle-specific trailer wiring harness (T-connector, no splicing), circuit tester, wire stripper/crimper, dielectric grease, zip ties, and electrical tape.
Skip posi-taps or cheap butt connectors—they corrode fast in engine bay heat.
- Trailer Wiring Harness Kit: $30-80 from etrailer.com, matched to your year/make/model.
- 12V Test Light/Multimeter: $10, essential for live testing.
- Heat-Shrink Butt Connectors: Waterproof, crimp with ratcheting tool.
- LED Flasher Relay: If your truck hyper-flashes with LED trailer lights.
- Ground Upgrade Wire: 10-gauge for long trailers.
Dealerships charge $300+ for a 30-minute plug-and-play install—DIY it in your driveway.
Step-by-Step Guide: Plug-and-Play Wiring Harness Installation
For 95% of modern vehicles (Ford F-150 2015+, Chevy Silverado 2014+, Ram 1500 2013+), buy a T-connector harness that plugs into factory pigtails behind tail lights—no cutting wires.
This taps signals without back-probing errors that fry modules.
Preparation Steps
- Park on level ground, chock wheels, disconnect battery negative.
- Locate tail light access panels (remove with plastic trim tools to avoid scratches).
- Trace wiring harness to connector plugs—usually 4-6 pins per side.
Installation for Most Pickup Trucks
- Plug T-connector into vehicle’s left tail light harness (match colors/arrows).
- Repeat on right side.
- Route black box (converter module) to a clean spot inside frame rail, away from exhaust.
- Ground white wire to clean frame spot—scrape paint, use ring terminal, dielectric grease.
- Run 4/7-pin output cable along frame to hitch, secure with zip ties every 18″.
- Mount socket upright with U-bolt or adhesive plate, seal with grease.
- Reconnect battery, test: hazards first (all lights blink), then brakes/turns.
Test drive: left/right turns at low speed.
If one side fails, swap sides to isolate vehicle vs. trailer issue.
Ford F-150 Specific Wiring Notes (2015-2023)
Ford’s integrated modules hate cheap harnesses—use #118576 from Curt.
Ground to frame, not body, or you’ll get intermittent right turn failures from voltage drop.
- Access: Remove tail light screws (10mm), pull harness from clip.
- Common Pitfall: Blue/orange wire is reverse—cap if not needed.
- LED Fix: Add #55210 load resistor per side if hyperflash.
Chevy/GMC Silverado Sierra Notes (2014-2023)
GM trucks need diode-based harnesses like #22109 to prevent feedback frying tail light circuits.
Route under spare tire—avoid pinch points.
Toyota Tacoma/Tundra Challenges
Toyota ECMs detect trailer load; use powered converter #20167.
Splice grounds if factory plug lacks strong white wire.
How to Wire Trailer Lights from Scratch (No Factory Harness)
For older trucks or cars without connectors, splice directly into tail light wires—but use Posi-Lock or heat-shrink, not tape.
This is where shops overquote $500; DIY in 2 hours.
Wire Identification and Splicing
- Unplug tail light connector, use test light on running truck: brown=running, yellow/green=turn/brake.
- Strip 1/2″ insulation, insert Posi-Lock, crimp, heat-shrink.
- Run 16-gauge wire to rear, bundle in loom.
- Separate brake/turn: Add relay kit ($20) triggered by brake switch.
Grounding Best Practices
Single point ground to frame cleans signals—star grounds cause flicker.
Upgrade to 10-gauge for 30+ ft trailers; voltage drop kills lights otherwise.
Troubleshooting Trailer Lights Not Working After Hookup
No lights? 80% ground or fuse—check truck’s trailer fuse first (often 30A in under-hood box).
Converter box fried? Smell burnt plastic.
Top 5 Fixes by Symptom
- Nothing Works: Bad ground—test continuity to battery negative.
- Left/Right Out: Swap signals at plug; if reversed, flip trailer wires.
- Brakes Don’t Activate Turns: Combined circuit—truck needs separate brake relay.
- Hyperflash: LED trailer + no resistors; add 6-ohm 50W per circuit.
- Flicker/Dim: Undersized wire/ground; measure voltage drop under load (<0.5V).
Multimeter trick: Key on, probe trailer pin to ground—12V steady means vehicle side good.
Vehicle-Specific Fixes
Jeep Wrangler JL (2018+)
Factory 4-pin weak; add #60619 powered harness. TIPM hates loads—inline fuse it.
Dodge Ram 1500 (2009-2023)
Right turn grounds to body—run dedicated frame ground.
Upgrading to Electric Trailer Brakes and Full 7-Way
Add brake controller (Tekonsha Prodigy P3, $150) after basic lights work.
Wire blue to controller output, black to battery via breakaway switch.
- Mount controller under dash (plug-n-play for most).
- Run 12-gauge from battery to tongue box, fuse both ends.
- Adjust gain: Test on slight grade, no lockup.
Reverse lights? Splice white/green at truck reverse wire.
FAQ
Why do my trailer turn signals work as brakes but not separately?
Your truck uses combined circuits, common on cars.
Install a brake light relay kit triggered by the brake light switch under the dash.
Can I use household wire for trailer lights?
No—it’s not rated for vibration/weather.
Use 16-gauge trailer-rated GXL wire only.
How do I fix water in trailer light sockets?
Drill tiny weep holes bottom-side, repack with dielectric grease, switch to LED sealed units.
Will LED trailer lights damage my truck?
Possibly—low draw causes hyperflash or no detection.
Add resistors or get truck’s LED-compatible flasher.
Do I need a battery on my trailer?
Yes for long hauls or charged accessories; connect black wire via 30A breaker.
In 20 years wrenching, I’ve hooked up thousands of trailers—most failures from skimped grounds or weather-beaten plugs.
Follow these steps, test rigorously, and you’ll tow reliably without dealership rip-offs.
Invest in quality parts once; cheap fixes strand you twice.
Leave a Reply